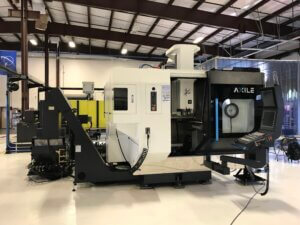
Exciting manufacturing research is happening daily at OMIC R&D (Oregon Manufacturing Innovation Center – Research & Development) and many types of HEIDENHAIN precision measurement components are working inside.
 HEIDENHAIN In Action at OMIC

Case Study from | HEIDENHAIN
Exciting manufacturing research is happening daily at OMIC R&D (Oregon Manufacturing Innovation Center – Research & Development) and many types of HEIDENHAIN precision measurement components are working inside.
OMIC R&D is the fifteenth global advanced manufacturing research center established originally with Boeing leadership, and is the first sponsored in the United States. The OMIC R&D facility, hosted by Oregon Tech (the state’s polytechnic university), is a growing campus located in Scappoose, Oregon. Now supported by 37 corporate members, state/federal government grants and three universities, it is serving as a world-class manufacturing collaborative environment, offering applied research and training opportunities.
The OMIC R&D building is equipped with best-in-class machine tool equipment in order to support Industry 4.0 smart technologies and more. HEIDENHAIN equipment first established on site in 2020 includes TNC controls, linear and rotary scales, as well as controls from its ACU-RITE brand. Also installed at OMIC is HEIDENHAIN’s StateMonitor MDA software which enables monitoring of both HEIDENHAIN and non-HEIDENHAIN CNCs via MT-Connect; this includes connection to FANUC CNC 3-axis machining centers, ACU-RITE-controlled knee mill machines and to 5-axis machining centers using HEIDENHAIN’s TNC 640 control.
Craig Campbell, executive director of OMIC R&D said at that time, “I had been excited about the possibility of having HEIDENHAIN as a member since we first started discussion at IMTS 2018. HEIDENHAIN is now providing OMIC R&D with immediate data gathering capability, and their ability to assist as we grow is tremendous. We also are looking forward to opportunities in the area of training and workforce development due to HEIDENHAIN’s investment in that area.”
Fast-forward to today, OMIC recently hosted a 5-axis machining training session conducted by two HEIDENHAIN staff members at the Oregon facility, featuring the TNC 640 control on OMIC’s new Axile G6 machine tool. This four-day training session was provided to college interns studying mechanical engineering as well as Axile technicians incorporating the TNC.

“For some of the students, this was a first time for them to touch and engage with a 5-axis machine tool,” explained Joe Pizzoferrato, a HEIDENHAIN 5-axis Applications Engineer. “And for all, this was an opportunity to learn about the power of the TNC 640 control, receive some basic 5-axis manufacturing training as well as learn multiple optimization techniques”. This training also allowed the students to work through various ‘what if’ 5-axis manufacturing scenarios in order to better prepare for future jobs. Joe added that two topics of particular interest were the TNC’s Table Files function which allows data movement rather than via an NC program, and the 3-point probe plane technique which allows a user to remove deviations of a re-worked part in the machine (also known as workpiece error compensation).
“It was very important to me to engage the students of tomorrow,” added Joe. “And quite rewarding to teach new engineers in our field as they picked up the information very quickly and were thankful for the training.”
Besides providing the students with this hands-on training opportunity with the machine in place, HEIDENHAIN and OMIC also set up six PC simulators with TNC 640 control panels in a classroom for use.

“The students asked really good questions as far as how to achieve better process reliability and ways to make machining easier like macro programming questions and such,” said HEIDENHAIN 5-axis Applications Engineer David Starosta. “And it was great to see many of them get excited to put a toolpath onto a machining project using the control without yet having even completed a CAM class. That was due to the easy-to-use conversational programming built in to the TNC 640.”
Plans are in place for HEIDENHAIN to conduct quarterly training sessions at OMIC.
OMIC’s Business Development Officer Josh Koch said “Our unique collaboration with HEIDENHAIN is an important piece in allowing us to be at the forefront of changing the industry. Together, we are coming up with unique solutions to today’s systemic challenges in manufacturing.”
The content & opinions in this article are the author’s and do not necessarily represent the views of ManufacturingTomorrow
Comments (0)
This post does not have any comments. Be the first to leave a comment below.
Featured Product

