Inductive eddy current technology is an extremely versatile non-contact method for measuring an object’s position, distance, or vibration.
 Tips for Reducing Error When Using Eddy Current Measuring Techniques

Kevin Conlin | Kaman Precision Products
Inductive eddy current technology is an extremely versatile non-contact method for measuring an object’s position, distance, or vibration. Unaffected by environmental contaminants or target finish characteristics, these sensors can operate in a vacuum or in fluids, so they work well for dirty applications, like those with oil or dust present. To get the most out of eddy current sensors, follow these tips for reducing errors that can affect a measurement’s accuracy.
Eddy current measurement basics
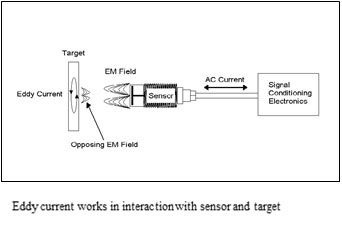
Inductive eddy current sensors operate by generating a high frequency electro-magnetic field about a sensor coil, which induces eddy currents in a target material. Eddy current sensors require a conductive target (usually some sort of metal), and sensor performance is affected by target material conductivity. Nonconductive material between the sensor and the target is not detected. The sensors do not require a ground connection to the measuring system. Measuring distance is typically 30-50 percent of sensor diameter.
 Inductive eddy current sensors have a large spot size compared to other technologies. They also have a higher frequency response, an advantage when measuring something moving very fast. This can make them a better choice than contact technologies like linear variable displacement transducers (LVDTs), which can interfere with the dynamics of the object being measured. Touching something that is moving to make a measurement adds mass, slowing down the system so it is not being measured at the actual speed.
Eddy current performance is affected by temperature changes, but can ignore contamination that would foul up laser triangulation/ LED, ultrasonic, or capacitive measurement technologies.
Sources of error with eddy current measurement techniques
Care must be taken to avoid common error sources associated with eddy current sensors. If not, users may not get a good measurement, may get more error than can be tolerated for the application – or they may not be able to get any measurement at all.
The main sources of error in eddy current measurement sensors include:
- Selecting the wrong circuit type
- Presence of another metallic object near the target
- Temperature variations or environmental conditions that affect measurement accuracy
- Multiple sensors mounted in too close a proximity
- Incorrect mounting
Tips for reducing errors
Select the right circuit
Eddy currents can be interpreted and processed into useful information in signal conditioning electronic circuits. Kaman uses three popular types of these circuits to process the signal:
- Colpitts circuit – single channel analog position measuring systems
- Balanced bridge circuit – single ended and differential analog linear position measuring systems
- Phase circuit – single/multiple channel analog high precision position systems
Each signal conditioning circuit type has distinct characteristics, so users should look for the one that performs best in any application should be chosen. To select the right circuit, begin by looking at the measurement – what kind are you taking? Is it single or differential? Look at the target – is it magnetic or non-magnetic? Knowing this information will go a long way to setting users on the path to reducing error.
For example, when the Colpitts circuit is used as a position measuring device, the sensor coil becomes the inductor in the oscillator circuit. When the sensor coil interacts with a conductive target, the oscillator frequency and amplitude vary in proportion to the target position. This variation is processed into an analog signal proportional to displacement.
Kaman typically recommends Colpitts circuits for low cost, general purpose measurements where linearity is not required. They can be a good choice for fuel injector testing, valve lift measurements, shaft or cylinder run out and vibration, and machining and grinding.
With a balanced bridge circuit, the target movement causes an impedance change in the sensor coil. This change of impedance in the coil is measured by the demodulator circuit, linearized by a logarithmic amplifier, and then amplified in the final amplifier stage.
In the single ended configuration, the systems are a good choice for both ferrous and non-ferrous targets, including general purpose linear position measurement, laboratory, research, development, and testing, metrology, and factory process control.
Differential bridge systems are frequently the best choice for fast steering mirror (FSM) position applications, pointing and tracking in night vision and laser systems, control systems for active vibration monitoring and control systems, and photolithography stage positioning and control.
If a phase circuit is used, the effects of eddy currents are not only amplitude related, but also phase related. This circuit is based on phase detection using pulse width modulation (PWM) techniques. Typical recommended applications include stage positioning in atomic force microscopy (AFM), Z-axis positioning in photolithography equipment, laser optics positioning, precision grinding, and semiconductor wafer transport mechanisms.
Adjust for the presence of another metallic object near the target
Measuring one metallic object when another metallic object is too close is a major source of error. This may depend upon the material, the size of target, and the measurement range. For example, it may be especially difficult to measure if the target is conductive but very small and thin and difficult to get close to. The potential for error will also depend upon how much material is required to interact with the eddy current field.
For example, in a racing engine research and development application, a Kaman customer wanted to ensure they were getting the correct engine stroke and were developing a system to test how various conditions would affect the stroke. They were trying to measure a piston moving, but there was another piston in close proximity and the measurement was “seeing” both pistons.
In this case, Kaman recommended mounting one sensor behind the piston and one in front of it. Each sensor was used to measure half the stroke. The end user was able to get closer to the piston with a smaller sensor that did not “see” the other piston.
Adjust and calibrate for the temperature and conditions
Be sure to calibrate the system in the environment in which it will be operating. Calibrating in one environment and then placing it in another may induce errors.
High and low temperatures have the potential to change the measurement. A measurement that is excellent at room temperature may change when taken at 500°F or at 1000°F. To adjust for this, if measuring across a wide temperature range, users should perform calibrations to show what error may exist at different temperatures.
For example, one recent customer was taking several measurements of blades inside a large gas turbine. The system is optimized for the key measurement, which is taken at 800-900°F, but also takes measurements at room temperature as the turbine is beginning operations. The measurement could be accurate at one or the other of these points – but not both. For this system, Kaman developed a sensor that was accurate at the higher temperature, and then used mathematical calculations to develop curves providing information on the error to be expected at the room temperature measurement.
Environmental conditions are also an issue in cases where there are multiple moving pieces and the system is trying to read only one. If the sensors pick up another moving metal object, one may be able to place another piece of metal in between to shield it. The fixed object absorbs the signal but one can still see the moving target. In short, the fixed piece simply becomes part of the environmental conditions and one can calibrate around it.
For applications that measure on a rotating target like a shaft, the surface velocity of the shaft can also affect the measurement. As it spins faster, it may look like a smaller target. Again, mathematical calculations can be developed to account for the size of the target, the material it is made of, and how fast it is moving to ensure that a proper measurement can be made using an eddy current sensor.
Avoid multiple sensors
Two or more sensors mounted in close proximity to each other may result in their electromagnetic fields intermixing, which may cause interference and reduce measurement accuracy. This interference is in the form of “cross talk,” resulting in beat notes whose frequency will be the difference between the frequencies of the oscillator in each unit.
Pay attention to mounting
The quality of any measurement depends on the mounting fixture. The amount of conductive material in or near the mounting fixture will have an impact on system performance. Mounting the sensor in a material that absorbs too much of the field results in measurement errors. For example, mounting an eddy current sensor inside a large steel block and recessing the sensor would absorb the field so it would be hard to measure.
A sensor is “side-loaded” when its field interacts with conductive material other than the target. Shielded sensors reduce this effect. For optimum performance, keep conductive material out of this field if possible. Perform in-situ calibrations if conductive material other than the target will be in the sensor’s field.
To eliminate the possibility of error, make sure the sensor is mounted so it is aimed as squarely at the target as possible. It should not be recessed and there should be nothing in its way to absorb the signal. If possible, mount the sensor inside a plastic block.
In addition, the target and sensor should be parallel to each other. Some non-parallelism can exist without inducing significant error. A non-parallelism of up to 3 degrees will increase nonlinearity less than 0.5 percent of full scale. Non-parallelism of 10 degrees will increase non linearity approximately 4 percent of full scale.
Allow for a certain amounts of errors
One final tip is to accommodate room for error. If one is looking for a measurement at half-inch, try to ensure the measurement can be made at three quarters of an inch, so there will be room to work within. Account for temperature errors by performing measurements with systems ahead of time to understand the shifts that may take place at higher temperatures, and be able to adjust for errors that may occur at different temperatures.
The goal should be to reduce errors to as low as possible
To ensure the best measurement with eddy current technology, select the right sensor, calibrate it carefully for the temperature and environmental conditions it will be operating in, and make sure to mount and position the sensors properly.
The content & opinions in this article are the author’s and do not necessarily represent the views of ManufacturingTomorrow
Comments (0)
This post does not have any comments. Be the first to leave a comment below.
Featured Product

