This article analyzes the role of cutting-edge optical metrology tools have in facilitating the manufacture of light-weighted engine components. Light-weighting is a priority for automotive OEMs in their quest to adhere to exacting engine efficiency and emission guidelines.
 Advanced Metrology Tools Enable Reliable Engine Light-Weighting

Michael Schmidt, Market Development Manager | Zygo Corporation
There have been many initiatives in recent years that are aimed at reducing vehicle emissions and increasing overall efficiency. This has required that the automotive sector focus enormous resources on optimizing engine performance.
Be it due to concerns over climate change or insulating economies against the vagaries of fuel costs and possible fuel shortages; the race is on to make vehicles considerably more efficient while at the same time maintaining a level of required functionality and attractiveness to stimulate sales and profitability.
FUTURE TRENDS REQUIRE UNIQUE SOLUTIONS
Focusing on efficiency, automotive OEMs are looking to reduce weight and at the same time, enhance the efficiency of engine performance. One area of focus in line with these goals is the replacement of cast iron cylinder liners used in aluminum cylinder blocks with more thermally efficient and lighter-weight materials. Various viable alternative materials and solutions exist that must be wear- and scuff-resistant as well as having a low friction coefficient, one such being thermal barrier coatings (TBCs). TBCs are the choice for many automotive OEMs today, effectively, coating the cast aluminum block bores with a spray of wear-resistant, ceramic, or composite material. This material will harden to form a much thinner surface — relative to a liner — in the aluminum cylinder. To date, the most commercially viable of these have been through the use of the plasma spray process, which exhibits superior wear resistance compared to iron.
TBCs AND THE REQUIREMENT FOR ADVANCED METROLOGY
However, there are also some inherent issues with the spray coating process that require the implementation of rigorous quality management procedures and measuring protocols. For example, at the high velocity with which the coating is applied to the cylinder wall, a splatter morphology occurs, leading to possible inconsistent coating.
Properties of the coating such as porosity, micro-hardness, thickness, adhesion, and strength are essential metrics in assessing its viability and provide important tools for evaluating which process parameters need to be changed to achieve an optimum coating (Robinson, Ramsundar, & Samantaray, 2014)
The non-deterministic porosity distribution across the surface of the cylinder after spraying requires the use of a metrology technology that is able to reliably, repeatably, and accurately measure the three phases required to produce a finished lined cylinder:
• mechanical activation,
• thermal spray application, and
• post-spray finishing.
Any metrology solution used to assess the surface characteristics of a spray-lined cylinder must be able to make highly accurate measurements at all three of the phases of the process, each stage transitioning from extremely rough to very smooth. This dynamic range of surface textures requires a metrology solution developed by ZYGO using its Coherence Scanning Technology (CSI) technology. CSI can capture data pertaining to a vast array of surface heights and textures and is used in ZYGO’s range of 3D optical profilers.
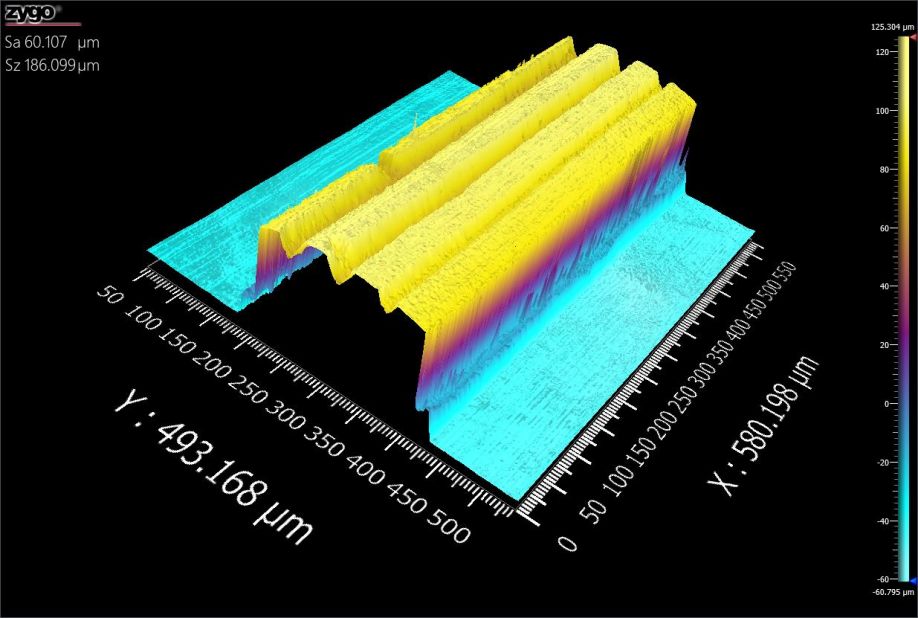
Mechanical Activation. For the mechanical activation / pre-coating stage of the process, the cylinder walls need to be scored, which needs to be strictly controlled as this dictates the amount of TBC that will be applied. Too thin, and there’s the possibility that the TBC can flake off. Too thick, and the honing process can remove the peaks that contain the TBC, either scenario potentially compromising the quality and efficiency of the cylinder coating process.
For such step-height-type measurements, ZYGO’s CSI technology enables the company’s optical profilers to speedily measure structures higher than 250µm with their extended scan capabilities accurately and repeatably.
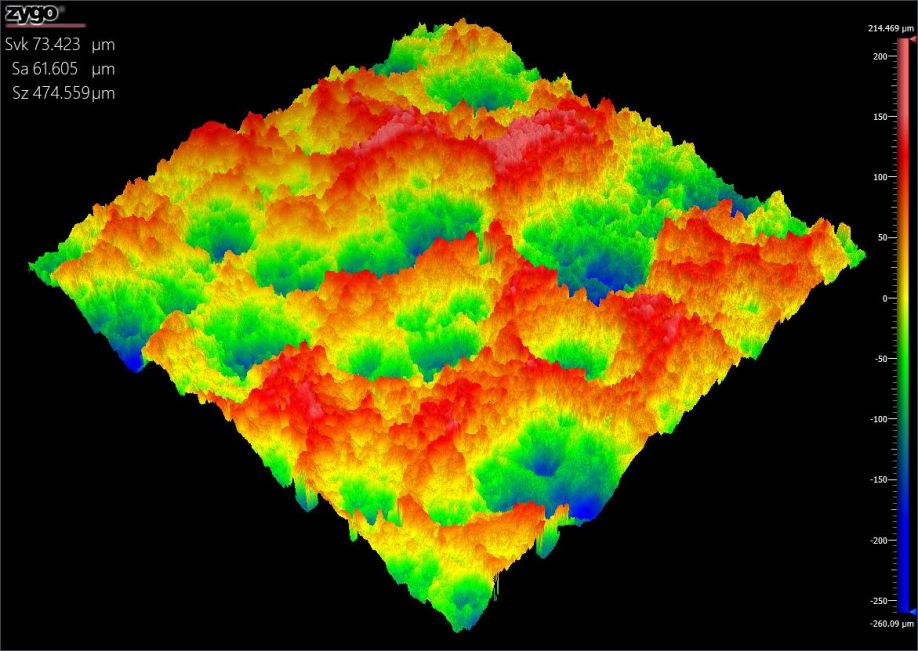
Thermal Spray Application. After the TBC application, automotive OEMs need to assess how the pores have developed. The variety of pore sizes — ranging from 50um2 to over 1mm2 — will help determine the lubricity retention of this newly sprayed surface. Because these pre-honed coatings are typically very rough and have low reflectivity, typical CSI systems will have difficulty acquiring data from the surface. With ZYGO, the new acquisition mode means such surfaces are easily measured, producing consistent metrics for process engineers.
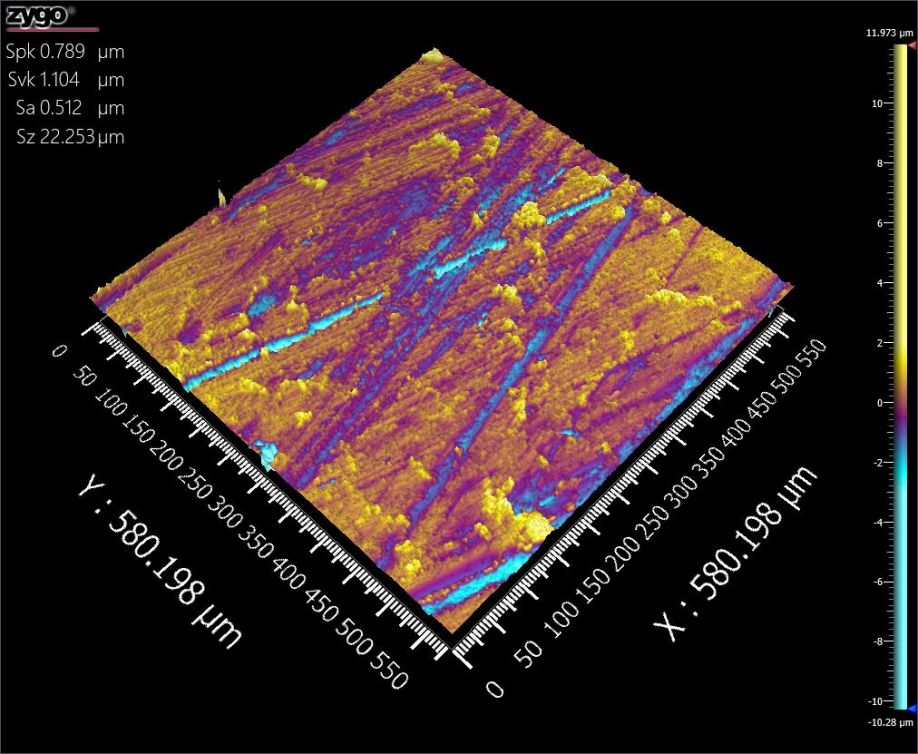
Post Spray Finishing. Finally, it is necessary to analyze the finished surface texture of the cylinder post- spray, checking crosshatch, as well as the final porosity (pore density, pore volume by area, and change of pore size by cylinder depth).
Transitioning from the very rough surface measurement pre-honing to this final assessment of extremely smooth honed surfaces displays the full dynamic range of the ZYGO CSI-based optical profiler systems, which cannot be matched by any other commercially available metrology tools. It is ZYGO’s development of new acquisition and processing methods that have significantly improved this dynamic range, enabling measurements of previously inaccessible steep surfaces and super-polished surfaces with one metrology solution.
CSI 3D OPTICAL PROFILERS
CSI extends interferometric techniques to surfaces that are complex in terms of roughness, steps, discontinuities, and structure. Additional benefits include the equivalent of autofocus at every point in the field of view and suppression of spurious interference from scattered light.
CSI technology is at the heart of all ZYGO’s 3D optical profilers, delivering sub-nanometer height precision at all magnifications, and analysis of a broader range of surfaces (from rough to super smooth, including thin films, steep slopes, and large steps) quicker and more precisely than other commercially available technologies. This makes it ideally suited to applications such as the spray-lined cylinder application detailed above.
ZYGO’s 3D optical profilers offer hundreds of reportable parameters when measuring surface structure and texture across varying surface scales, including areal surface roughness to ISO 25178 standards, and 2D profile standard compliance to ISO 4287/4288.
Alternative technologies, such as fax film, rely on affixing a thin sheet of plastic to the cylinder surface and applying a solvent to soften and conform the sheet to the surface. When removed and sufficiently hardened, it is then manually inspected under a microscope. This method, though used extensively, is messy, and can result in very subjective results.
Other optical measurement technologies tend to perform sub-optimally when the surface texture is considered quite smooth. Confocal and focus variation technologies, for example, require some level of texture on the surface to be able to resolve the surface. When looking specifically at the metrology demands connected with the analysis of the spray-coating of cylinders, ZYGO’s CSI 3D optical profilers benefit from being non-contact, thereby eliminating any chance of the inadvertent compromising of surface integrity. In addition, CSI technology enables the highest vertical resolution measurement agnostic of the interferometric objective.
ZYGO’s CSI technology effectively acquires data, but it is through the company’s Mx software that this data is processed and interpreted and gives users the ability to quantify and visualize results. Mx™ software powers complete system control and data analysis, including interactive 3D maps, quantitative topography data, intuitive navigation, and built-in statistical process control (SPC), control charting, and pass/fail limits. Interactive and detailed data plots show full area data in 2D or 3D.
Mx comes as standard with the company’s 3D optical profilers and ensures that they are able to measure very rough and very smooth surfaces in an easy-to-assess and timely fashion. It is in applications such as the analysis of TBCs that such cutting-edge metrology solutions become enabling technologies. The required analysis of the TBCs must be undertaken in-process, with high accuracy, repeatably and speedily enough to ensure that the coating option for cylinder lining is economically viable. The strength of ZYGO’s data acquisition through CSI and data processing using Mx represent critical drivers behind the TBC solution for the replacement of cast iron cylinder liners.
Mx uses a simple workflow-based concept, allowing manufacturing engineers analyzing the extent and uniformity of the TBCs to easily navigate the metrology experience from set-up through analysis and reporting. The comprehensive and intuitive ways in which Mx presents the results of its data analysis ensures that users can visualize measurements and assess results easily and quickly, which allows fast and reliable decision making. This has a profound effect on the manufacturing and process development aspect of the spraying of the cylinders and leads to higher efficiencies and process and quality improvements.
Mx is just one example of the emphasis that ZYGO places on data processing as a way of elevating the status of its 3D optical profilers as enabling technologies that enhance manufacturing processes.
The emphasis is on higher data density allowing the precise and fast measurement of more and more complex and challenging features and surfaces. Surfaces that were previously considered challenging for interference microscopy can now be easily imaged and measured using ZYGO’s expanded range of smart features, improved sensitivity, and higher dynamic range. ZYGO’s Mx software allows the precise measurement of the most challenging surfaces, including steep slopes, low reflectivity or rough surfaces, and ultra-smooth surfaces.
SUMMARY
The automotive industry is at the forefront of the development of technological solutions that mitigate the effects of pollution and harmful emissions. By utilizing more innovative materials and methods to lightweight modern internal combustion engines, manufacturers can minimize fuel consumption and boost overall engine efficiency. One aspect of this progress is seen in the development of cylinder spray coating, enabling aluminum alloy engines to utilize robust tribological materials within the harsh environments as the cylinder combustion chambers.
The nature of the coating process and the viability of the finished coating in what is a harsh mechanical environment require the use of extremely accurate and repeatable metrology tools to confirm conformance with required surface porosity specifications. The measurements needed when analyzing the spray-coating technology demand metrology tools that are able to measure both extraordinarily rough and extremely smooth surfaces. Many optical metrology tools struggle with such height variations, but the 50-years of experience that ZYGO has in manufacturing best-in-class non-contact metrology tools means that it has developed a family of 3D optical profilers driven by CSI technology and the Mx data processing engine which are ideally suited to such exacting applications, and promote fast and reliable decision making, and process and quality improvements.

Figure 1. Mechanical activation will provide the anchor for the thermal barrier coating to adhere to the cylinder wall surface.

Figure 2. Measurements of the dark, rough features of the post-TBC can provide process engineers information on the formation and distribution of surface porosity.

Figure 3. Honing generates the proper stratified surface for the sliding ring/cylinder interface. Quantifying the lubricity by direct measurement of porosity will assist with honing process control.
Mike Schmidt, Market Development Manager for the Zygo Corporation, has served the precision machining and industrial markets for nearly two decades and has extensive knowledge of non-contact optical metrology technology and the development of application solutions. Mike has assisted numerous market-leading and global precision manufacturing companies in the transition and deployment of optical technology and process control solutions to the factory floor.
The content & opinions in this article are the author’s and do not necessarily represent the views of ManufacturingTomorrow
Comments (0)
This post does not have any comments. Be the first to leave a comment below.
Featured Product

