A camera-supported alignment and measuring system ensures precise, fast measurement of straightness and flatness in mechanical engineering.
 Adjust with Light - A Case Study from IDS Imaging

Case Study from | IDS Imaging Development Systems Inc.
Straightness and alignment are essential for trouble-free plant operation, especially with large machine components and rail constructions. Even small discrepancies can lead to increased signs of wear and paralyse a complete system. A precise alignment or measurement of e.g. linear guides is therefore decisive for the quality and service life of a system. With the ELWI-GER 3000, HOFBAUER OPTIK Mess- & Prüftechnik from Munich provides the machine and special machine manufacturers with the right instrument. The optical alignment and measuring system works precisely and quickly with the help of uEye industrial cameras and is suitable for long lengths up to 100 m.
Electronic autocollimators use the absolute straightness of light for non-contact high-precision measurements. The smallest straightness deviations of a surface or a guide can be detected by angle changes. For this purpose, a collimated light beam, i.e. a light package with parallel individual beams, leaves an optical system and is reflected back into it by a plane mirror. The ELWI-GER 3000 electronic autocollimator from HOFBAUER OPTIK thus enables 2-dimensional precise and rapid measurement of straightness and flatness. The flexible system can be used on technical surfaces for alignment and control of linear guides as well as for curvature measurement on large components and rail systems. This makes it just as suitable for plant construction as for track and tunnel construction. It can also be used for tasks such as testing stone rulers as straightness standards. For example, a granite ruler with a length of 160 cm can be measured in less than 5 minutes with an accuracy of < 0.5 µm/m. The optical testing device records the straightness in X and Y directions simultaneously and enables use in any position (spatial axis). The system includes the measuring head as well as extensive accessories such as an adjustable holder, a measuring mirror, an attachment laser as well as the corresponding USB connection to the display unit. Nevertheless, it is small and compact and works up to 8 hours in battery mode - ideal for service applications.
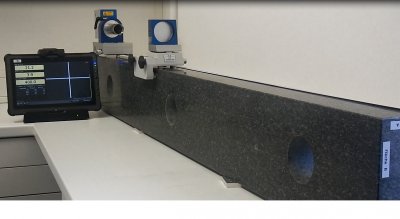
Precise measurement of a 160 cm long stone straight edge with 0.5 µm/m
The system is controlled directly using a robust IP65-compatible tablet with intuitive touch screen - application and practice-oriented. Data transmission and remote control of the measuring system can also be done via smartphone. Straightness evaluation is possible directly without an additional PC. An automatic protocol with document tracking is available as a report in PDF format after each measurement.
Fast and precise thanks to camera technology
"With the ELWI-GER 3000, we are continuing a consistent development of precision measurement technology in mechanical engineering. The integrated uEye industrial camera from IDS Imaging Development Systems makes a major contribution to this," explains Dr. Engelbert Hofbauer, owner and development manager at HOFBAUER OPTIK Mess- & Prüftechnik.
The system sees a crosshair or a vignetted light area - i.e. with shading to the edge of the image - in monochrome LED light. These result mathematically from the correlation function of two circular areas of the same diameter. The latter in turn arise during autocollimation, as mentioned above, by reflection of the emitted light cone from a distant mirror. The intensity distribution in the image or on the camera results in a regular circular cone, whereby several so-called V-SPOTs can also be visible in different applications. The precise position of the V-SPOT is calculated with subpixel accuracy (< 1/50 pixel peak-to-valley and 1/100 deviation from the square mean). Based on this, corresponding angles in up to 3 dimensions (degrees of freedom) and simultaneously up to 3 degrees of positional freedom are determined.
Thanks to the patented vignetting method, Hofbauer is the only company in the world capable of overcoming the problems of the classic autocollimation method and measuring lengths of over 100 m with angular second accuracy even at extremely large angles (1000 sec = 17 mm/m) and evaluating them according to the tilt method.
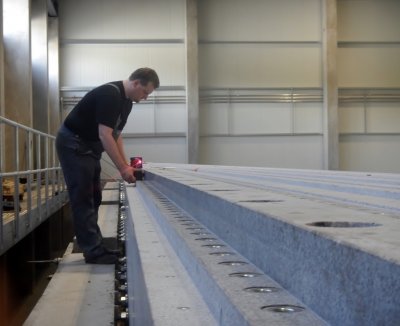
Curvature measurement on large components
Measurement techniques
Two possible measuring methods are available to the user: With the inclination method, a measuring mirror on a mirror base or on the guide carriage of a linear guideway is led in equally large steps over the test specimen and the change in inclination is measured. The straightness is determined and displayed by summation (integration) of the determined height differences from the partial sections. With this method, the highest accuracy can be achieved with the lowest measurement uncertainty. Alternatively, depending on the application, the height method can also be used for measurement. The reflector is also attached via a suitable base or to the linear slide or the movable axis (machine table, cross beam, etc.) and can be positioned at any point on the path. The deviation from the ideal straight line (optical axis) is measured and displayed immediately and directly. The advantage here: Adjustment processes can be carried out directly.
Camera models
The ELWIMAT-GER 3000 contains one industrial camera each from the uEye camera family, depending on the customer application. Various models are available with a GigE or USB 3.1 Gen 1 interface, either as a board level variant or with a housing. Whether it is a low-cost project camera or a compact power pack, they all offer particularly easy handling, long service life and long-term availability. All models are 100% quality tested and pre-calibrated. Thanks to the extensive IDS software as well as IDS-typical plug & play, they can be integrated quickly and easily and are therefore particularly economical.
The UI-3272LE-M-VU, for example, is a cost-effective and versatile project camera from the uEye LE USB 3.1 Gen 1 series with a pioneering, reversible USB Type-C connector. Via USB Power Delivery it is possible to offer a variable peripheral power supply at the I/O port. It is equipped with the Sony IMX265 area sensor - one of the best image sensors in the 3 MP pixel class. The 1/1.8" size of the Global Shutter CMOS Sensor provides a large selection of suitable lenses. The industrial camera delivers frame rates of up to 57 fps at full resolution (3.2 MP: 2056 x 1542 px) and 80 fps at Full HD resolution. Therefore, the USB 3.1 Gen 1 camera is perfectly suited for visualization tasks in machine vision applications. The board level variants are available with vertical (-VU) - as in the ELWIMAT - or horizontal USB Type-C connector and also have a 10-pin I/O SMD connector for GPIO, trigger and flash.
Thanks to the fast USB 3.1 Gen 1 technology, the data transfer rate could be increased from 480 MBit/s to 5 GBit/s with the same or an even higher cable length. The measurement frequency in full screen mode increased by a factor of 5 from 12 frames/second to 57 fps. For special applications in vibration and frequency analysis, the clock rates can be extended to the KHz range using AOI technology as well as subsampling and binning methods.
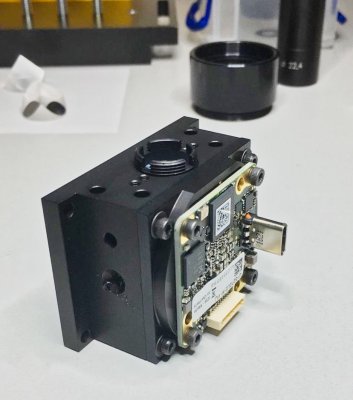
The UI-3272LE-M-VU is mounted on the central element of the sensor.
Software
Hofbauer uses the IDS Software Development Kit to integrate the industrial camera into its system. "With the IDS SDK we have the advantage of a uniform programming interface for all IDS cameras. Programming is therefore independent of the connection of the model - no matter whether USB 2, USB 3.1 Gen 1 or GigE," explains Dr. Hofbauer and adds: "In addition, new camera models are supported without software changes. This perfectly matches our goal of reconciling the highest demands on measurement technology with user-friendly operability." Other reasons for using the IDS software were the simple use of additional functions such as EEPROM and GPIOs. The SDK is also compatible with Windows and Linux.
Outlook
Straightness and alignment are indispensable in mechanical and plant engineering. The ELWI-GER 3000 enables simple measurement, adjustment and logging of results for a wide variety of applications. Even the smallest variations in angle can be measured. In contrast to the competitors, it achieves measuring lengths of over 100 m with an accuracy of 0.5 micrometres per metre for straightness measurement, i.e. 0.05 mm per 100 m measuring distance. The flexible and mobile applicability as well as the extensive range of accessories also ensure real customer benefits. Camera-supported and using only light, the system ensures contactless "plane conditions".
Client
HOFBAUER OPTIK Mess- & Prüftechnik is an owner-managed engineering office for optical metrology. The company develops devices including software and solutions for the optical industry and mechanical engineering, always with the aim of reconciling measurement technology and user-friendly operability. http://www.hofbauer-optik.de
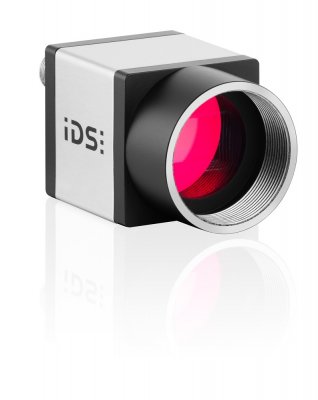
Camera
1) GigE uEye CP industrial camera:
The tiny power pack for industrial applications with PoE functionality
Model: UI-5240CP-NIR-GL Rev.2
Interface: GigE
Sensor type: CMOS
Manufacturer: e2v
Frame rate: 60.0 fps
Resolution: 1280 x 1024 / 1.31 MPix
Shutter: Global Shutter, Global Start Shutter, Rolling Shutter
Optical class: 1/1.8"
Dimensions: 29.0 mm x 29.0 mm x 29 mm
Weight: 49 g
Interface connector GigE RJ45 screwable
Applications: 3D scanning, security technology, gaze and gesture tracking, traffic monitoring and license plate recognition, industrial image processing, quality assurance, medical technology, astronomy
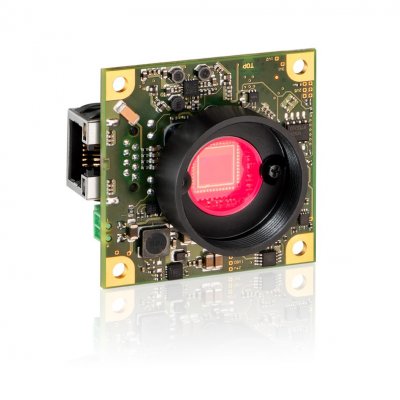
2) GigE uEye LE boardlevel industrial camera:
Compact CMOS single board camera with excellent image quality and additional features
Model: UI-5244LE-NIR-GL
Interface: GigE
Sensor type: CMOS
Manufacturer: e2v
Frame rate: 50.0 fps
Resolution: 1280 x 1024 / 1.31 MPix
Shutter: Global Shutter, Global Start Shutter, Rolling Shutter
Optical class: 1/1.8"
Dimensions: 45.0 mm x 45.0 mm x 27,1 mm
Weight: 24 g
Interface connector GigE RJ45
Applications: 3D scanning, security technology, gaze and gesture tracking, traffic monitoring and license plate recognition, industrial image processing, quality assurance, medical technology, astronomy
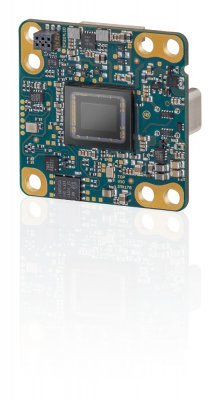
3) uEye LE USB 3.1 Gen 1:
The cost-effective and versatile project camera with USB Type-C connector and USB Power Delivery
Model: UI-3272LE-M-VU
Interface: USB 3.1 Gen 1
Sensor type: CMOS
Manufacturer: Sony
Frame rate: 57.0 fps
Resolution: 2056 x 1542 / 3,17 MPixel
Shutter: Global Shutter
Optical class: 1/1.8"
Dimensions: 36.0 mm x 36.0 mm x 15.0 mm
Weight: 9,5 g
Interface connector USB Type-C (vertical)
Applications: Machine Vision, Medical Technology, Embedded Systems
About IDS Inc.
IDS Inc. was founded in 2007 as a subsidiary of IDS Imaging Development Systems GmbH. The industrial camera manufacturer IDS Imaging Development Systems GmbH develops high-performance, easy-to-use USB, GigE and 3D cameras with a wide spectrum of sensors and variants. The almost unlimited range of applications covers multiple non-industrial and industrial sectors in the field of equipment, plant and mechanical engineering. In addition to the successful CMOS cameras, the company expands its portfolio with vision app-based, intelligent cameras. The novel image processing platform IDS NXT is freely programmable and extremely versatile.
The content & opinions in this article are the author’s and do not necessarily represent the views of ManufacturingTomorrow
Comments (0)
This post does not have any comments. Be the first to leave a comment below.
Featured Product

